

click to enlarge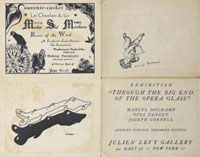

Figure 1
Julien Levy Gallery’s Exhibition
Announcement for Through the Big End
of the Opera Glass, 1943 In 1943, Marcel Duchamp was asked by the gallery owner Julien Levy to design the announcement for an exhibition to be called “Through the Big End of the Opera Glass.”(1) As the title implies (adapted, as it was, from Lewis Carroll’s Through the Looking Glass), the show was to feature unusually small-scale work. Years later, Levy explained that the idea for the exhibition came from having seen an example of Duchamp’s valise, in which the artist had packed miniature reproductions of his work into a portable suitcase.(2) The show was to include not only work by Duchamp, but by two other artists as well: the French Surrealist painter Yves Tanguy, and the American collage and assemblage artist, Joseph Cornell. Within the announcement (Fig. 1), Duchamp reproduced a black-and-white layout by Cornell featuring the titles of Cornell’s work printed in a variety of expressive type faces surrounded by a collage of images referring to them, while Tanguy was represented by a drawing of one of his characteristically biomorphic three-dimensional shapes, accompanied, in this particular instance, by an opaque black shadow that curiously overlaps it.
click to enlarge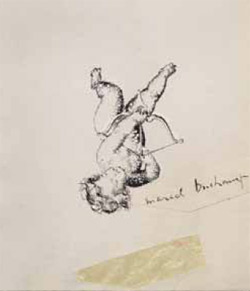
Figure 2
Marcel Duchamp, Cupid, Collection of the
Honorable Joseph P. Carroll
For his own contribution, on the back cover of the announcement Duchamp provided the image of a cupid with a stretched bow and arrow in his hands, but the figure is inexplicably reproduced upside down, for the artist’s signature—which is oriented legibly—streams off to one side at the level of the cupid’s head. At first glance, knowing that Duchamp often appropriated imagery for whatever purpose was required—in the fashion of culling images readymade—one might easily conclude that the cupid was clipped from some printed source and collaged into this position. However, the original layout for this announcement was recently discovered among the effects of Julien Levy, and it is now known that Duchamp painstakingly drew the cupid himself in pen and ink (Fig. 2). It is likely that he took the time to render this image because he could not find the reproduction of a cupid fixing his arrow in this precise direction, a detail that, as we shall soon learn, is critical to his intent, for the significance of the cupid’s aim can only be understood when the announcement is unfolded and fully opened.
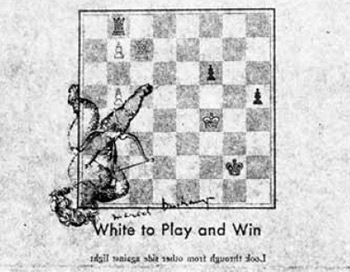
Figure 3
Detail of Julien Levy Gallery’s Exhibition Announcement for Through
the Big End of the Opera Glass, 1943The paper stock Duchamp selected for this ephemeral publication was a translucent sheet folded in quadrants, forming a booklet. The first thing the recipient would have seen upon removing the announcement from its envelope was the title page, providing the name of the exhibition, its dates and its location. Upon opening the booklet, he would find Cornell’s layout opposite Tanguy’s drawing, and, on the back cover, Duchamp’s cupid. Closer examination of the cupid would reveal that something is printed on the opposite side of the paper: below Duchamp’s signature, in red ink, one can faintly read the words: “White to Play and Win” (Fig. 3). To chess enthusiasts, this phrase can mean only one thing: one is being presented with a chess problem to solve in which white is instructed to move first and eventually go on to win the game. Indeed, just above it, one can discern the faint outline of a chess board with pieces in various positions, printed, like the writing below it, on the opposite side of the sheet. If, at this point, someone is compelled to unfold the sheet and examine the opposite side, Duchamp provided additional instructions: “Look through from other side against light.”
For those already familiar with Duchamp’s work, these words might well bring to mind the elaborate title that he gave to a work on glass from 1918: To Be Looked at (from the Other Side of the Glass) with One Eye, Close to, for Almost an Hour (The Museum of Modern Art, New York). The comparison may not have been a simple coincidence of wording, for if an attempt were made to solve the chess problem, even grand masters would likely need more than an hour to solve it. If we follow Duchamp’s instructions and “look through from the other side against light,” we will see the layout of a chessboard from the proper position (with a white square in the lower right corner), each player with a king, a pair of pawns, and a single rook. We will also see the cupid he drew on the other side, the arrow from its bow pointing down the white knight’s file (or “B” file in algebraic notation), suggesting that the next best possible move for White would be to advance its pawn. One who studies this endgame problem at any length, however, would determine that this move would not attain a win for white. Indeed, virtually any move by white seems to result in a draw, even though there are a few compelling scenarios that—until properly analyzed—give the false impression that white has a chance to win (see analysis in boxed insert).
AN ANALYSIS OF DUCHAMP’S ENDGAME PROBLEM
AN EXCHANGE WITH LARRY EVANS
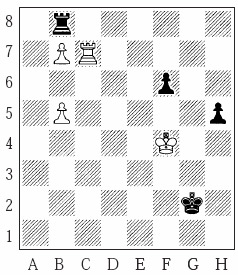
Diagram A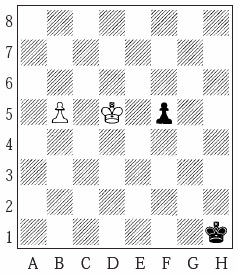
Diagram BAt first glance, the endgame chess problem that Duchamp devised (see Diagram A) gives the impression that White could play and win, for White has a pawn on the seventh rank and a quick promotion would seem inevitable. Black has two isolated pawns that could also advance, but they are farther from promotion and look as though they could easily be attacked by White’s rook. The following scenario seems plausible, as was suggested to me thirty years ago by international grandmaster Larry Evans:(I)
- 1.
- White
- Black
- 2.
- Ke4!
- h4
- 3.
- Kd5
- h3
- 4.
- Kc6
- h2
- 5.
- Rg7+
- Kf3
- 6.
- Rh7
- Kg2
- 7.
- Kc7
- Rxb7+
- 8.
- Kxb7
- h1=Q
- 9.
- Rxh1
- Kxh1
- 10.
- Kc6
- f5
- Kd5 and wins
- (see Diagram B)

Diagram C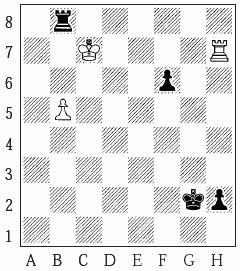
Diagram D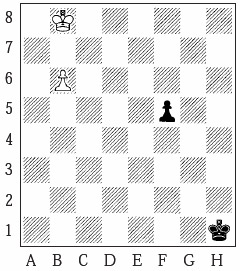
Diagram E
This variation, however, misses a possible move for Black, one that would not only extend play, but would eventually result in a draw.(II) After the white king moves to c7 (the sixth move), the pieces are in the position and shown in Diagram C.
At this point, Black is forced to move his rook (otherwise, the white king will capture it on its next move). If he captures the white pawn and checks white’s king at the same time, the result will be a win for White (as Evans demonstrated above). But if Black moves his rook to g8 (6. … Rg8), he is in a far better position. There, if White promotes on the next move, he can capture the promoted piece (as indicated in Diagram D).
On the very next move, the white king will capture the black rook. The white rook will then capture the black pawn when it promotes, and the black king will, in turn, take the white rook, leaving a pair of kings and isolated pawns on each side of the board, a position that results in a draw.
There is another scenario that would allow White to continue play even further. After 6. … Rg8, if White does not promote his pawn on the 7th move, but, rather, advances his other pawn one square forward (7. b6, in the direction indicated by the Cupid’s arrow), play would continue as follows:
- 7
- …
- h1=Q
- 8
- Rxh1
- Kxh1
- 9
- b8=Q
- Rxb8
- 10
- Kxb8
- f5 draws

Diagram F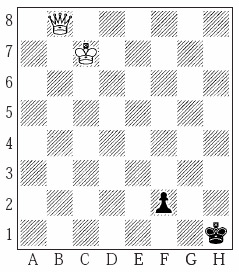
Diagram G
In this position, it may appear that White will win, since his pawn seems closer to promotion. When played out, however, this leads to Diagram G (discussed below), resulting in another book draw. A number of other possible scenarios were later suggested by Larry Evans. In the initial position, he strongly encouraged investigation of moving the white king to e3, or advancing the trailing pawn to b6 (as suggested in Duchamp’s design by the direction of the Cupid’s arrow).(III) This latter suggestion (1. b6) eventually transposes to Diagram E. Following the strategy that I had proposed—of Black moving his rook to g8—Evans also suggested that White promote right away on b8, followed by a black rook capture (thereby eliminating White’s pawn that was threatening to promote). White’s king would then capture the black rook on b8, followed by the promotion of Black’s pawn, which would, in turn, be captured by the white rook. The black king would then capture the white rook, leaving the position found in Diagram F. If we compare the final positions in Diagrams E and F, we discover that they are very similar and transpose into each other. They both lead to Diagram G, which ends in a classic draw (as explained below). In position F only, the white pawn would queen, leaving the black king protecting a pawn that is about to promote (see Diagram G). The position leads to perpetual check, or stalemate.
The way a stalemate is achieved (from Diagram G) is that White starts a series of checks leading to the following position: White Kc7, Qg4 (check); Black: Kg2, f2. Then after … Kh1, Qf3+ Kg1, Qg3+, Black does not protect his pawn with … Kf1 (because then the white King steps back up the board, followed by a series of checks and King moves again, leading to eventual mating position), but instead plays … Kh1! Then if the white Queen takes the pawn with Qxf2, it is a stalemate; but meanwhile, Black is threatening to promote. So White has to give perpetual check or allow stalemate.(IV)
The way a stalemate is achieved (from Diagram G) is that White starts a series of checks leading to the following position: White Kc7, Qg4 (check); Black: Kg2, f2. Then after … Kh1, Qf3+ Kg1, Qg3+, Black does not protect his pawn with … Kf1 (because then the white King steps back up the board, followed by a series of checks and King moves again, leading to eventual mating position), but instead plays … Kh1! Then if the white Queen takes the pawn with Qxf2, it is a stalemate; but meanwhile, Black is threatening to promote. So White has to give perpetual check or allow stalemate
Figure 4
Black & White photograph of Larry Evans playing
chess with Marcel Duchamp (Larry Evans is on
the left and Marcel Duchamp is on the right)Larry Evans—who had played chess with Duchamp on more than one occasion (Fig. 4)—was sufficiently intrigued by this problem that he graciously accepted my request to publish it in his monthly column in Chess Life & Review.(V) At the time, I offered a $15 reward for its solution, not realizing that I would be inundated with responses, a number of which came from prison inmates who demanded immediate payment of the reward. Phone calls from several of these individuals were all the intimidation I needed to send checks, even though none of their solutions were actually convincing. The most thoughtful and detailed responses came from regular readers of Chess Life & Review, specialists in endgame strategy who proposed a variety of intriguing possibilities, all hoping that theirs was the ultimate solution (although I do not believe that any of them actually were). I have since subjected this problem to the most powerful computer programs available to me, and no solution has yet been found. I am now all the more convinced that this is a problem that cannot be solved. Duchamp has given us, in effect, a problem with no solution.(VI)
 I. In an effort to solve this problem, I wrote to E. B. Edmondson, then executive director of the American Chess Federation. He passed on my inquiry to Larry Evans, who responded to me in a letter dated June 2, 1976. II. I presented these alternatives to Mr. Evans in a letter dated June 4, 1976. III. Letter from Evans to the author, June 5, 1976. IV. The analysis of this final position was generously provided by Allan G. Savage, author of
Reconciling Chess: a Marcel Duchamp Sampler (Davenport: Thinkers’ Press, 1998), and who is in the process of writing the fourth volume of the series published by Moravian Chess, The Chess Biography of Marcel Duchamp (1887-1968), which is scheduled for publication in 2008.
V. “Larry Evans on Chess,” Chess Life & Review (October 1976), p. 580. VI. I have provided copies of the present analysis to several experienced chess players: Jennifer Shahade, Ralph Kaminsky, Allen G. Savage and Malcolm H. Wiener. These individuals are familiar with standard chess analyses and, although they agree with my general conclusion (that the problem has no solution), they believe my analysis to be redundant and—in comparison to professional analyses— somewhat amateurish. Nevertheless, I am grateful to all of them for having taken the time to review my text, and for having provided various recommendations for its improvement.
The rigor and intensity of this endgame problem stands in sharp contrast to the means by which Duchamp presents us with a hint of its solution: a cupid aiming his arrow toward the ground (or into the sky, if we consider that the cupid is presented upside-down). Cupid is, of course, the mythological god of love, and his arrow is usually aimed in the direction of an amorous target; a direct hit can cause the recipient to fall deeply and blindly in love. Knowing this, and knowing that when Duchamp designed this brochure he had recently met and fallen in love with Maria Martins— a Brazilian sculptor, married with three children, and in almost every respect, unattainable—one is tempted to speculate that Duchamp might have had a personal situation in mind when he decided that a cupid should indicate the path to follow in pursuing a solution to this vexing problem. Duchamp was well known for having said: “There is no solution, because there is no problem.”(3) In the end, the problem that he faced with Maria Martins was insurmountable, demonstrating that in both chess and life— and perhaps in art as well—there are, indeed, problems without solutions.
Notes
This article first appeared in The Sienese Shredder no. 1 (Winter 2006-2007), pp. 180-87. At the time when it appeared, I was unaware of the fact that Grandmaster Pal Benko had published an analysis of this same endgame problem, concluding—as I did—that there was no solution (see “Duchamp Solved!?,” Chess Life [August 2005], p.588). I am grateful to Ralph Kaminsky for having drawn this article to my attention.
1. The date of this exhibition has been given variously, as either 1943 or 1948. Julien Levy consistently gave the date as 1943 (see his autobiography, Memoir of an Art Gallery [New York: G.P. Putnam’s Sons, 1977], p. 309, as well as the reference contained in the following note). For reasons that are unclear, however, in all editions of his otherwise reliable catalogue raisonné of work by Marcel Duchamp, Arturo Schwarz gives the date as 1948 (see The Complete Works of Marcel Duchamp [New York: Harry N. Abrams, 1969], cat. no. 329, page 523; revised and expanded edition [New York: Delano Greenidge Editions, 1997], cat. no. 530, p. 793, and descriptive bibliography 71, page 904). The date of 1943 cannot be challenged, however, for the show was reviewed in The New York Times on December 12, 1943 (I am grateful to Ingrid Shaffner for bringing this citation to my attention).
2. See the statement provided by Julien Levy for a brochure published on the occasion of “Through the Big End of the Opera Glass II,” a recreation of the original 1943 show at the Joan Washburn Gallery, New York, February 15 -March 12, 1977 (the brochure contained a facsimile reprint of the original fold-out catalogue).
3. This comment seems to have been quoted for the first time in Harriet and Sidney Janis, “Marcel Duchamp: Anti-Artist,” View, series V, no. 1 (March 1945), p. 24; it is repeated again in Winthrop Sargeant, “Dada’s Daddy,” Life, vol. 32, no. 17 (April 28, 1952), p. 111.
Fig. 1-3, © 2008 Succession Marcel Duchamp, ARS, N.Y./ADAGP, Paris.
Authorization to publish this article was provided by the author, Francis M. Naumann and The Sienese Shredder.
