page3
Articles
Vol.1 / Issue 3


Why the Hatrack is and/or is not Readymade:
with Interactive Software, Animation,
and Videos for Readers to Explore

by Rhonda Roland Shearer with Gregory Alvarez, Robert Slawinski, Vittorio Marchi and text box by Stephen Jay Gould

* Please note this essay contains 8 videos,
10 animations and 3 interactive presentations.

<PART I>


4. 1964 Blueprint with Interactive 3D model of lost version, Schwarz 3D Hatrack model
This blueprint turns out to be a poor interpretation made by an anonymous draftsman while tracing the 1917 Boîte en Valise (see illustration 11A, showing overlay of 1941 Boîte hatrack [placed on its side] with the blueprint. See the circled section on #11B and compare this to the circled part of #11C, instead of interpreting the first small hook (from the right) making a continuous "S" shape moving from the first long hook on the right, the blueprint indicates that the 1st short hook is a separate piece awkwardly sticking out from within the side of the first long hook. It is interesting to note that there is no indication of the draftsman having had a conception that the hatrack was made of "S" shapes anywhere in this muddle of 3 small and 2 long hooks, (with each hook having its own size and unrelated curved shape).

Click all images to enlarge
Illustration 11A.
Overlay of the 1964 Hatrack blueprint with the 1941 Box in a Valise photograph (detail); individual images shown on the right
Note: circles are for clarity added by author

Illustration 11C
 
Illustration 11B.

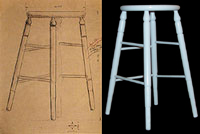
My examination of other 1964 blueprints for other Schwarz readymades might be helpful to mention here. Also signed "Marcel Duchamp, okay," the bicycle stool blueprint is similarly ambiguously and inaccurately drawn (most likely because Schwartz's draftsman did not know how to interpret the broken legs and rails as depicted in the 1941 Boite-en-valise print of the bicycle wheel (also showing the coatrack). See illustration #12A, B and C, notice that the two most right horizontal rails in the blueprint go in two different directions and are cut off oddly, as depicted in the original studio photograph (12C). In addition, the 3 legs are not evenly spaced as one would expect in a blueprint (and the fourth leg is missing completely) and yet in the final Schwarz edition (12D), all legs are completely symmetrical. Note that illustration 12B also contains the within 3D model we made using the information contained in the 1964 stool Blueprint (also 12B).

click all images to enlarge
Illustration 12A.
Illustration 12B.
Print made from of the original studio photo (1916-17) for the Box in a Valise, 1941
© 2000 Succession Marcel Duchamp, ARS, N.Y./ADAGP, Paris
Comparison of 1964 Blueprint of the Bicycle Wheel (Stool) with the ASRL 3D model made from its information
© 2000 Succession Marcel Duchamp, ARS, N.Y./ADAGP, Paris
Illustration 12C.
Illustration 12D.
Original Studio Photograph, 1916-17
© 2000 Succession Marcel Duchamp, ARS, N.Y./ADAGP, Paris
Bicycle Wheel, 1913/64,
Schwarz edition of 8
© 2000 Succession Marcel Duchamp, ARS, N.Y./ADAGP, Paris

Click to enlarge
Illustration 13A.
Photograph of Duchamp's Studio by Man Ray, 1920
Illustration 13B.
Marcel Duchamp, Blueprint for In Advance of the Broken Arm, 1964
© 2000 Succession Marcel Duchamp, ARS, N.Y./ADAGP, Paris
Illustration 13C.
Front and side views of the ASRL 3D models of actual Schwarz shovel (left and longer) and a shovel made from the blueprint (the smaller one on the right)

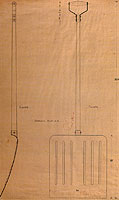
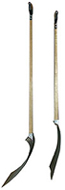
The shovel blueprint indicates that the handle was literally traced from a well known Man Ray photograph that captured the shovel hanging high above eye level, (see illustration 13A and B). At this height, as the eye looks up the shovel's wooden shaft's outside edges appear to converge (and get narrower with more distance.) To create a blueprint, perspective distortion must be accounted for (and discarded) if you use a photograph as a source to recreate an accurate 3D model. See the shovel blueprint illustration 13B, the front and side elevation views both depict the converging lines that were later, amusingly translated in the construction of Schwarz's 3D model. The shovel's wood shaft, literally gets progressively more narrow from metal blade to the handle. See illustration 13C showing the final Schwarz 3D model built from the blueprint as a much smaller 3D model on the left than the shovel on the right that was built from measurements of actual example of the Schwarz edition of 8 snow shovels)(9).

Click to see video
Illustration 14A

Marcel Duchamp, Hatrack, 1917/64
© 2000 Succession Marcel Duchamp, ARS, N.Y./ADAGP, Paris

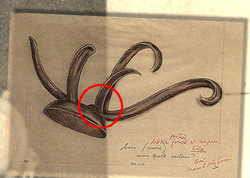
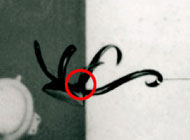
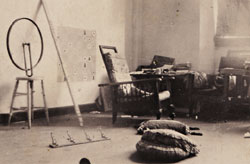
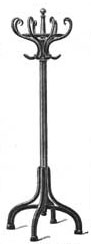
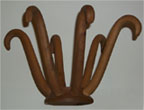
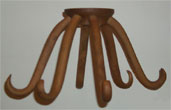
Let us return to the hatrack blueprint 1964 and the 3D model. If Schwarz's 1st version of the hatrack 3D model, indeed, looked like the geometry in this blueprint, it's no wonder why Duchamp insisted upon throwing it out and felt he had to redesign it.. . and yet his 2nd and final version of the Schwarz hatrack looks even less like the photographs of the "original" 1916-17 hatrack in his studio! (I will later discuss the likely reason why Duchamp approached his hatrack in this technique of "information" that decays in a series of snapshots over time).

5. 1964 Blueprint with Interactive version of 3D Schwarz model
Before considering the interactive 3D model, one can see that the blueprint has nothing to do with what ends up as the 2nd and final version of the Schwarz 3D hatrack model.
See video and illustration 14A of the Schwarz 3D model, in addition to the interactive model, how do we install this hatrack? Does it go on a wall? If so, how? If you place the 3 hooks up, the other 3 hooks go down, and half are therefore useless.
Click to enlarge
Illustration 14B.
Illustration 14C, 14D.

Thonet standing hatrack, "Thonet Bentwood & Other Furniture," illustrated catalogue, 1904, p. 80

ASRL wood model
of Schwarz 1964 Hatrack wood 3D model in two positions

Placing 3 on the left side and 3 on the right side is not much better. Sitting on a table does not make sense; neither does somehow hanging it upside down from the ceiling. The radial, symmetrically distributed series of curves definitely reminds one of the top the free standing-type Thonet coatrack/hatrack shown in illustration 14B and video 14E.
Click to see video
Illustration 14E.

1999 version of 'Alice in Wonderland' uses Thonet hatrack as prop ©1999 Babelsberg International Filmproduktion GmbH & Co. Betriebs KG and Hallmark Entertainment Distribution Company

However, as much as we are vaguely reminded of such a hatrack, a critical comparison quickly reveals that the tops of these Thonet free standing structures are a circular series of "S" curves. Moreover, Schwarz's hatracks (edition of 8) are not even bentwood but have been carved as shown earlier in illustration 14C and D (our study model of the Schwarz editions). Moreover, note that the 6 equal length hooks curve out whereas the real free standing Thonet "S" hooks at the top curve in(10), see illustrations 14 C and D. 14C reminds us of the top part of the "S's" in the standing Thonet (14B); whereas, 14D reminds us of the S's lower set of curves that turn up.

Compare 5 Interactive Models with Tu m' and Cast Shadows Depictions
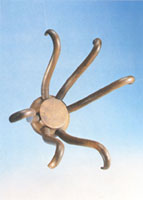
The final 2 representations from Duchamp's 6 depictions that we will discuss are Tu m's 1918 hatrack and Cast Shadows' hatrack, 1918. These are both shadow projections that can also be compared to five interactive 3D models (1904, 1917, 1917, 1964, 1964)

Click to enlarge
Illustration 15A.
Marcel Duchamp, Tu m' (detail; rotated by 180º), 1918 © 2000 Succession Marcel Duchamp, ARS, N.Y./ADAGP, Paris
Illustration 15B.
Historical Thonet hatrack, 1904

The Tu m' shadow's 2 long hooks and 3 short hooks, in particular, (see illustration 15A, B) if viewed upside down and then compared to the 1904 Thonet model when rotated into similar position, can readily be seen as fragments of 3 "S" shape hooks (albeit, that the 3 "S"'s in Tu m' are incorrectly and asymmetrically angled in relation to each other and the top of one is cut off when compared to the Thonet 1904 3D model below).

The 1918 Tu m' painting brings us back to the issue, previously mentioned, of the difference in making objects in 3D, versus interpreting what these same objects look like, due to distortions, in a photograph, or in perspective drawings. Just as a bicycle wheel can objectively be perfectly round in shape and yet appear in a photograph as an ellipse, the same is true of any object's representation. Representations must be interpreted. We, in fact, because of a prior experience, can safely guess that the bicycle wheel is round but only appears to be an ellipse due to perspective distortions. However, an alternative hypothesis could be true, though not as likely -- that the bicycle wheel is not round but shaped like an oval. How can we know? The answer is two-fold. If we have access to the original wheel, we can test it (roll it and see if it smoothly and evenly rolls) and measure it (and see if the axis is in the middle of the circumference of a circle).

In the case of Duchamp's hatracks and other readymade objects, we are in the same position of discovering that a bicycle wheel that we assumed was round in a photograph was, in fact, oval. Since we only had a set of photographs of the second version of the Bicycle Wheel, and not the actual object, the only thing we could do was to take measurements from the 2D representations, fuse and build 3D models (both physically and in computers) based upon the group of photographs, and then test and measure again.

1916-17
Click to enlarge
Illustration 16A.
Set of photographs showing the 2nd version of the Bicycle Wheel, 1916-17
(Both the original and this 2nd version are lost.
There are no representations known of the 1913 original Bicycle Wheel and Stool.)
© 2000 Succession Marcel Duchamp, ARS, N.Y./ADAGP, Paris

Click for video
Illustration 16B.
Assembled 3D model of Bicycle Wheel by Rhonda Roland Shearer
Illustration 17.
Marcel Duchamp, Ombres Portées (Cast Shadows), 1918
© 2000 Succession Marcel Duchamp, ARS, N.Y./ADAGP, Paris
Note: arrow is for clarity added by author

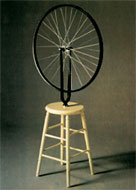
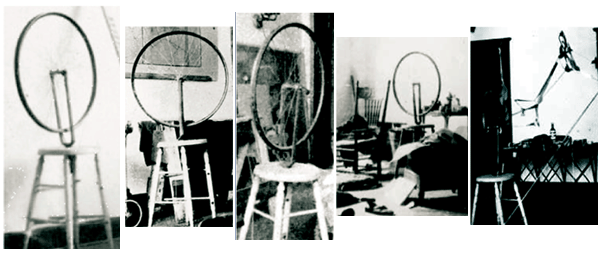
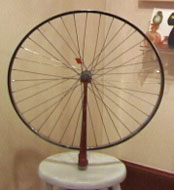
Ironically, my bicycle wheel example turns out not to be hypothetical. See illustration 16A, B. From the set of bicycle wheel photographs, after we made measurements and models, and tested them, Robert Slawinksi, in our ASRL group, concluded that the axis of the Duchamp bicycle wheel was, in fact, not in the center of the wheel! Duchamp had lengthened some spokes and shortened others to create a large and surprising effect that is based upon only a very small difference in the decentered positioning of the axis. Click on #16B to see the video of what happens when our 3D model of one of Duchamp's bicycle wheels turns(11).

click to enlarge
Illustration 18A.
Ombres portées (Cast Shadows), detail showing two shadows projecting from With Hidden Noise (1916), 1918
© 2000 Succession Marcel Duchamp, ARS, N.Y./ADAGP, Paris
Note: circles are for clarity added by author
Illustration 18B.
Marcel Duchamp, With Hidden Noise with mirror, 1916
© 2000 Succession Marcel Duchamp, ARS, N.Y./ADAGP, Paris

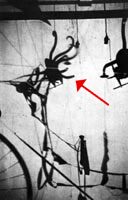
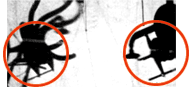
The Cast Shadows 1918 photograph should also be examined by spectators in comparison with the 5 interactive hatrack models, see illustration 17. This representation of the hatrack indicates 3 long hooks and two short hooks. The first long hook on the left, hanging by a string, ambiguously appears as if it could be attached in a whole "S" shape with the first small hook on the left. A more likely interpretation is that the middle long hook is one "S" curve with the first (left) small hook and that the long hook at the most right is connected to the right most small hook. Yet this is unclear for the right most long hook could share an "S" shape with the left most small hook. In addition to the hatrack shadow ambiguities, other ambiguities reign in this photograph. For example, Duchamp's work Hidden Noise (see illustration 18A, a closeup of the Cast Shadows, 1918) oddly appears twice (he supposedly only had one original in 1918 -- the multiple edition of 8 was made much later in 1964, see #18B that shows the original Hidden Noise.) One has to conclude that Duchamp either somehow used mirrors to multiply the Hidden Noise shadow, or he created a photographic composite where he layered different photographs together into one image(12). Duchamp used both techniques in his photographs, a topic we will explore in the next section.


page3

1 2 3 4 5 6 7 8 9 10