|
page2
|
|
Why
the Hatrack is and/or is not Readymade: by Rhonda Roland Shearer with Gregory Alvarez, Robert Slawinski, Vittorio Marchi and text box by Stephen Jay Gould
<PART I> |
||||||||||||||||||||||||||||||
|
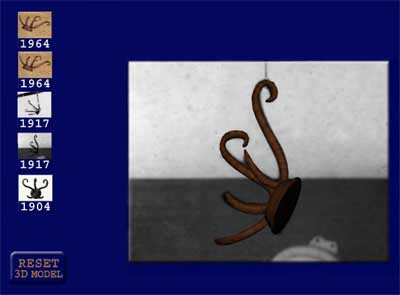
Interactive Software Instructions: Please test out the
interactive hatrack software that we have installed(6).
To select a hatrack click on one of the 5 icons shown on the
upper left. Hold the left side of the mouse down. Making sure the cursor's
hand icon switches on (while the arrow is moving) roll the mouse on
the hatrack's round base and "pull" the 3D model off its fixed
position in the 2D representation. Interactive challenges include; the
1941 print of a studio photo (and an early stage of our hatrack 3D computer
model), the 1917-18 studio photo (and an early stage of our hatrack
3D computer model), the 1964 Schwarz blueprint (with a computer model
of the Schwarz 3D version), the 1964 Schwarz blueprint (with an early
stage of our hatrack 3D computer model) and, a 1904 Thonet hatrack catalogue
diagram (and equivalent 3D computer model)(7).
To explore these 5 models, keep the left side of the mouse down, (always
beginning with the hatrack's base) and roll the mouse in various directions,
and compare the 3D shape of the hatrack to the 2D representation. Rotate
each of the 5 hatrack 3D models in all x, y and z directions that are
possible in 3D space (north, south, east, west, up and down). Try to
visualize the 2D representation that you choose as a 2D slice (cut),
or only one fixed perspective view of the 3D hatrack form. Also, practice
placing the 3D models back into the best possible position matching
the 2D depiction you have chosen. The 5 computer models
shown in the hatrack interactive design result from early stages of
our geometric analysis of the 6 hatrack representations in combination
with our research of available mass-produced hatrack models in the historical
record (found in period catalogues, patents, museum collections and
design books). The order of occurrences and the quantity and choice of 5 interactive models above differs from the earlier illustrations #2A, B, C, D, E, and F that I originally sited as Duchamp's 6 hatracks cuts. For clarity, I will discuss each of the 5 interactive models separately starting with the 1904 Thonet catalogue image and 3D model. What
To Look For: 4
Hatracks from the
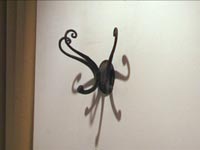
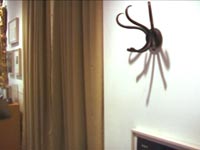
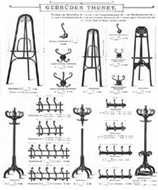
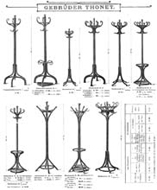
See illustrations and videos 7A, B, C, and D showing lab members hanging hats on four hatracks from the Art Science Research Lab collection. The first wood model below is the closest one that we have found that has characteristics common to all six of Duchamp's hatrack representations, and appears similar to Thonet bentwood style #11022. Thonet Brothers mass-manufactured and shipped their original Bentwood designs throughout the world. See illustration #8A, B showing the title page for the 1904 catalogue and the page for hatrack #11022. Try the Thonet 1904 interactive 3D model. Note how symmetrical the hatrack appears and how it matches the catalogue drawing. The patented technology that allowed Thonet to permanently shape wood for furniture without carving (hence bentwood), became immediately recognizable by the "S" curve module units. Note too, that the illustration 7A Thonet hatrack has three "S" curves on a round base. The 7B and 7C Thonet-style hatracks, one in metal and the other in wood, also have 3 "S" hooks. Click to see videos of each hatrack in the ASRL collection. The illustration 7D video shows the official Thonet paper label on the back. As you can see from all 4 videos, each of the hatracks are wall units, and each can easily hang hats. Both Thonet catalogue pages illustrations #9 and 8B show examples of the common bentwood hatrack/coatrack free-standing models still in use today. 2.
1917 Hatrack (2nd Interactive hatrack model from bottom) Moreover, the 2nd "S"'s bottom, small hook is a wider shape and less curved when compared with the first "S"'s bottom small hook. Finally, the third small hook is missing the top, long hook part of the "S". In order to represent Duchamp 1917 2D depiction in 3D, we had to cut off the long curve from the "S" hook and leave the bottom small hook curve in yet a different angle from the first and second "S"'s two bottom small hooks. See illustration #10 that shows a front view of this hatrack with its cut off long hook. Rotate the interactive 1917 3D model into the face forward position (like the Thonet 1904's position) and then go back to compare the Thonet 1904 3D model. Importantly, try to place this Thonet 1904 into similar positions as the first or second "S" hooks in the 1917 Duchamp 2D depiction. (The 3D Thonet model here is slightly squatter than Duchamp's 1917 hatrack.) 3.
1917 Hatrack (3rd Interactive hatrack model from the bottom)
|
||||||||||||||||||||||||||||||